
construction,
What's better than seeing the guys in your life dappered up in a stylish bow-tie? When the bow-ties are specifically made by YOU!

This special DIY doesn't require any sewing skills or a trip to the store for supplies! With simple materials you can take absolutely any fabric you want and transform it into a custom-made bow-tie! Since you only need a little, try using a vintage scrap of something you love or a piece of fabric that means something to you and your family. But this DIY works on silks and other fancier fabrics too, making it ideal for every event.
THE TOOLS
HOW TO
1. Measure and cut your pieces. You will need one of each of the following pieces: 20x3.5", 6x1.75", 8.75x4.5", 9.5x5". If you're making a child-sized bow-tie, you'll need to adjust the size accordingly.
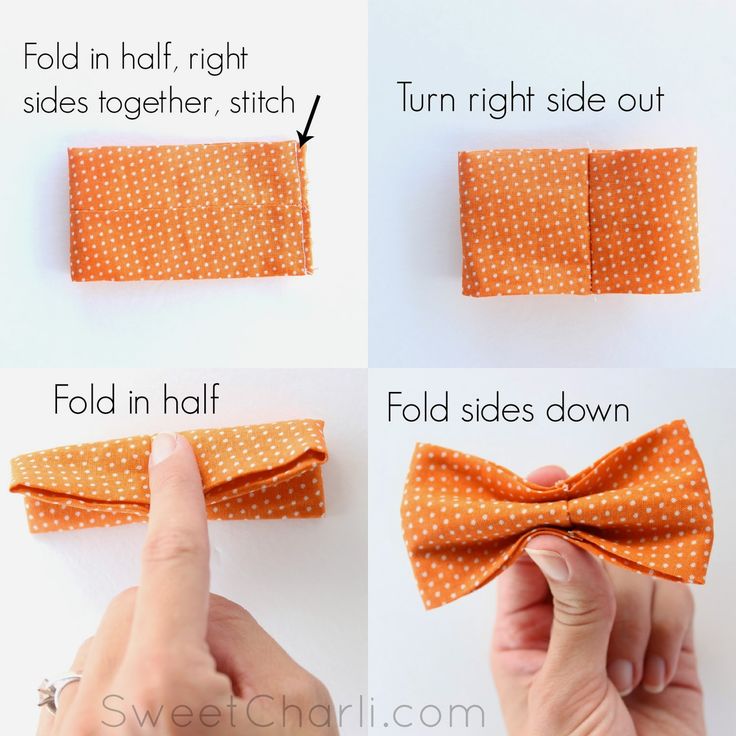
2. Prep your pieces. Starting with the 9.5x5 and 8.75x4.5 rectangles, fold the two long sides to meet in the middle and iron to create flat folds. The fold the two end sides down and hot glue into place. Repeat for the the two narrow pieces.
3. Create the bow. Take the two rectangles and stack the smaller one on top of the larger one, securing in place with hot glue on each corner and in the middle. Next, fold in half towards you and hot glue directly in the center and pinch together. Turn your seam to the inside then fold in half and fold the sides down then secure with hot glue, holding in place to let the glue harden.

5. Assemble the bow-tie. With the bow facedown, use a little hot glue to attach the 20" strip, making sure to attach it in the middle. Next, glue one end of the 6" piece to the center of the back and wrap around the front of the bow and secure again in the back with hot glue, trimming it as needed to fit. An alternative method would be to secure the center piece first with hot glue and then safety pin on the strap.
6. Finally, if using velcro, iron on 3" of Velcro to the straps. Make sure to iron on opposite sides so they meet up to fasten together. If not, tie straps together then tuck under!
I hope you enjoyed this simple DIY!
Until next time. - D💋
FOLLOW ME ↓
FB - https://www.facebook.com/mssoellegant
IG - https://www.instagram.com/mssoellegant
SC - https://www.snapchat.com/add/mssoellegant
Blog - https://www.mssoellegant.blogspot.com
AFFILIATE LINKS & CODES ↓
https://www.ipsy.com/new?cid=ppage_opensubs&sid=link&refer=ws5xn
https://share.fashionnova.com/x/NKprBC
https://glossgenius.com/invite/theglowmother
DIY No Sew Bow Tie
What's better than seeing the guys in your life dappered up in a stylish bow-tie? When the bow-ties are specifically made by YOU!

This special DIY doesn't require any sewing skills or a trip to the store for supplies! With simple materials you can take absolutely any fabric you want and transform it into a custom-made bow-tie! Since you only need a little, try using a vintage scrap of something you love or a piece of fabric that means something to you and your family. But this DIY works on silks and other fancier fabrics too, making it ideal for every event.
THE TOOLS
- > Roughly 1/2 yard of fabric (your choice)
- > Scissors
- > Ruler
- > Iron and ironing board or surface
- > Pencil
- > Hot glue gun and glue sticks
- > Iron-on Velcro (Optional)
HOW TO
1. Measure and cut your pieces. You will need one of each of the following pieces: 20x3.5", 6x1.75", 8.75x4.5", 9.5x5". If you're making a child-sized bow-tie, you'll need to adjust the size accordingly.
2. Prep your pieces. Starting with the 9.5x5 and 8.75x4.5 rectangles, fold the two long sides to meet in the middle and iron to create flat folds. The fold the two end sides down and hot glue into place. Repeat for the the two narrow pieces.
3. Create the bow. Take the two rectangles and stack the smaller one on top of the larger one, securing in place with hot glue on each corner and in the middle. Next, fold in half towards you and hot glue directly in the center and pinch together. Turn your seam to the inside then fold in half and fold the sides down then secure with hot glue, holding in place to let the glue harden.
5. Assemble the bow-tie. With the bow facedown, use a little hot glue to attach the 20" strip, making sure to attach it in the middle. Next, glue one end of the 6" piece to the center of the back and wrap around the front of the bow and secure again in the back with hot glue, trimming it as needed to fit. An alternative method would be to secure the center piece first with hot glue and then safety pin on the strap.
6. Finally, if using velcro, iron on 3" of Velcro to the straps. Make sure to iron on opposite sides so they meet up to fasten together. If not, tie straps together then tuck under!
I hope you enjoyed this simple DIY!
Until next time. - D💋
FOLLOW ME ↓
FB - https://www.facebook.com/mssoellegant
IG - https://www.instagram.com/mssoellegant
SC - https://www.snapchat.com/add/mssoellegant
Blog - https://www.mssoellegant.blogspot.com
AFFILIATE LINKS & CODES ↓
https://www.ipsy.com/new?cid=ppage_opensubs&sid=link&refer=ws5xn
https://share.fashionnova.com/x/NKprBC
https://glossgenius.com/invite/theglowmother


0 comments: