Showing posts with label DIY. Show all posts

DIY No Sew Bow Tie


What's better than seeing the guys in your life dappered up in a stylish bow-tie? When the bow-ties are specifically made by YOU!

This special DIY doesn't require any sewing skills or a trip to the store for supplies! With simple materials you can take absolutely any fabric you want and transform it into a custom-made bow-tie! Since you only need a little, try using a vintage scrap of something you love or a piece of fabric that means something to you and your family. But this DIY works on silks and other fancier fabrics too, making it ideal for every event.

THE TOOLS
  • > Roughly 1/2 yard of fabric (your choice)
  • > Scissors
  • > Ruler
  • > Iron and ironing board or surface
  • > Pencil
  • > Hot glue gun and glue sticks
  • > Iron-on Velcro (Optional)

HOW TO
1. Measure and cut your pieces. You will need one of each of the following pieces: 20x3.5", 6x1.75", 8.75x4.5", 9.5x5". If you're making a child-sized bow-tie, you'll need to adjust the size accordingly.

2. Prep your pieces. Starting with the 9.5x5 and 8.75x4.5 rectangles, fold the two long sides to meet in the middle and iron to create flat folds. The fold the two end sides down and hot glue into place. Repeat for the the two narrow pieces.

3. Create the bow. Take the two rectangles and stack the smaller one on top of the larger one, securing in place with hot glue on each corner and in the middle. Next, fold in half towards you and hot glue directly in the center and pinch together. Turn your seam to the inside then fold in half and fold the sides down then secure with hot glue, holding in place to let the glue harden.
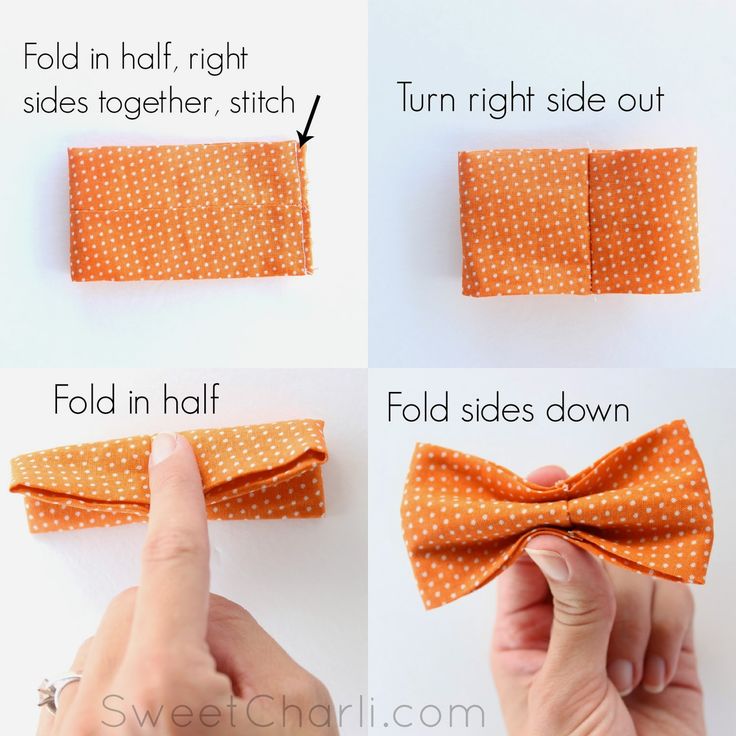

5. Assemble the bow-tie. With the bow facedown, use a little hot glue to attach the 20" strip, making sure to attach it in the middle. Next, glue one end of the 6" piece to the center of the back and wrap around the front of the bow and secure again in the back with hot glue, trimming it as needed to fit. An alternative method would be to secure the center piece first with hot glue and then safety pin on the strap.

6. Finally, if using velcro, iron on 3" of Velcro to the straps. Make sure to iron on opposite sides so they meet up to fasten together. If not, tie straps together then tuck under!

I hope you enjoyed this simple DIY!

Until next time. - D💋

FOLLOW ME ↓
FB - https://www.facebook.com/mssoellegant
IG - https://www.instagram.com/mssoellegant
SC -  https://www.snapchat.com/add/mssoellegant
Blog - https://www.mssoellegant.blogspot.com

AFFILIATE LINKS & CODES ↓
https://www.ipsy.com/new?cid=ppage_opensubs&sid=link&refer=ws5xn
https://share.fashionnova.com/x/NKprBC
https://glossgenius.com/invite/theglowmother

DIY $25 "Diva" Ring Light!


DIY Diva Ring Light for under $25! This DIY is great for MUAs and Youtubers. You can make your own ring light instead of spending $200+ on a Diva or similiar ring light. All supplies came from Walmart and took less than an hour to make!

Products:
Green Wire Wreath: https://bit.ly/2u2sxd8
LED Lights: https://bit.ly/2qY9ke2
Cable/Zip Ties: https://bit.ly/2HAi3a0
Parchment Paper: https://bit.ly/2u15UWO
Aluminum Foil: https://bit.ly/2J4KqP0

Cardboard - From the wreath box.
Tape - Standard scotch.
Marker - Black.
Scissors

Until next time. - D💋

FOLLOW ME ↓
FB - https://www.facebook.com/mssoellegant
IG - https://www.instagram.com/mssoellegant
SC -  https://www.snapchat.com/add/mssoellegant
Blog - https://www.mssoellegant.blogspot.com

AFFILIATE LINKS & CODES ↓
https://www.ipsy.com/new?cid=ppage_opensubs&sid=link&refer=ws5xn
https://share.fashionnova.com/x/NKprBC
https://glossgenius.com/invite/theglowmother

Dean Winchester Makeup & Cosplay


Dean Winchester (Jensen Ackles) is one of the leading characters from the American television series Supernatural. Dean is a human who hunt spirits and paranormal creatures with the help of his younger brother Sam, his fathers old family friend Bobby Singer, and his best friend the angel Castiel.

So you want to dress up like Dean Winchester, huh?  Do a little Supernatural cosplay? In my opinion, Dean’s style of dress in Supernatural is pretty timeless. Heck, he even went back in time in one episode, and his wardrobe didn’t seem too out of place.  If you’re cosplaying as Dean Winchester or just love the look, I can see why.  It’s pretty simple and masculine.  I mean, you’re wearing boots, jeans and flannel.  How do you get manlier than that?

Before you don yourself with boots and leather jacket look a like, make sure you have these 10 essentials:

  1. Dean is always wearing some awesome looking jacket.  For true Supernatural cosplay and to be a real badass, you’ll have to get yourself a leather jacket.  Don’t forget to slightly pop the collar.  Not too much, just enough to let everyone know you are one cool dude.
  2. You cant be Dean without the tough guy 'tude. With a raspy voice, witty quips and the right facial expressions, no one’s gonna mess with you.
  3. If you are going to cosplay Dean Winchester, you have to get the music right.  No rap, no country, no pop. Just classic rock. Don’t be surprised if strangers start mistaking you as a character from Supernatural if you’ve made it this far down the list.  But we’re not finished yet. 
  4.  You’re not just going for a character from the show, but THEE character from the show. You can’t just wear any old pair of shoes or boots.  You need footwear that strikes fear into the hearts of demons, angels, and enemies alike. Courtesy of: your sole. No not your soul, your sole.
  5. Drink whiskey.  Straight.  Mixing hard alcohol is for wusses.  And you’re not a wuss, are you? Ok, so you’re just cosplaying.  Maybe you don’t want to be wasted 24/7.  That’s understandable.  So you need to find a good replacement.  Apple juice in a whiskey bottle?  No one will ever know, and you keep your badassery in check.
  6. Dude, Don’t Forget the Pie! Eat! Greasy burgers, greasy fries, gas station junk food, and of course, pie.  If you haven’t consumed at least a few thousand calories worth of junk in a day, you’re doing something very wrong. You’re a hunter!  You risk your life fighting evil bad guys all day long.  You’re sure to die in some gruesome and horribly painful way at the hands of one of the monsters you hunt.  No need to fear a puny little heart attack.
  7. Be Fiercely Loyal to Family - Whether it’s your adopted fallen angel brother, or your real brother that you’ve raised since you were a kid yourself, you are loyal.  No questions asked, they come first, everything else comes second. Just how loyal is “fiercely” loyal?  For starters, you should have zero problems with waltzing into Hell to save your brother.  Also, if your fallen angel buddy absorbs the souls of thousands of creatures from purgatory, thus becoming the most powerful angel to ever exist, you’d stand up to him.  Sure, he could erase you from existence without so much as batting an eyelash, but he’s your brother, and you’d do anything to help him. Even die.
  8. Wear a Sentimental Necklace - Ok, so your little brother may not have given you a God-detecting amulet necklace when you were a kid.  If you need one, you can get a great deal on Dean’s amulet. You’re a badass tough guy.  But you have a soft side, and a bit of sentimental jewelry can’t hurt, right? Speaking of your soft side…
  9. Have a Sentimental Side. You are one tough son-of-a-bitch.  People avoid looking directly at you out of fear and respect.  But buried deep, deep down inside of your hard outer shell is a soft core. But you’re Dean Winchester.  You can count on one hand how many people have seen you cry, or show any sensitive emotion.  So until you’ve been to Hell and back multiple times, and have had to sacrifice your soul for your little brother’s life…You don’t know what emotion is.
  10. Be Awesome. Last but not least, be awesome.  Dean Winchester cosplay isn’t just about the clothes and the attitude.  It’s about an overall awesomeness.  When you walk into the room, people just notice you.  You can’t help it, it’s just the way you are. Be sure to let people know you’re awesome.  Especially after you accomplish something great, like stopping the Apocalypse, or surviving purgatory with help from a vampire and an angel, for example.
Now onto the hard part... Makeup.

Take 1


Until next time. - D💋

FOLLOW ME ↓
FB - https://www.facebook.com/mssoellegant
IG - https://www.instagram.com/mssoellegant
SC -  https://www.snapchat.com/add/mssoellegant
Blog - https://www.mssoellegant.blogspot.com

AFFILIATE LINKS & CODES ↓
https://www.ipsy.com/new?cid=ppage_opensubs&sid=link&refer=ws5xn
https://share.fashionnova.com/x/NKprBC
https://glossgenius.com/invite/theglowmother

New Pointe Shoes: How To Sew & Break Them In


I am not sure what else can compare to a brand new sparkling pair of pointe shoes. Unfortunately, they are as stock as they come and are in no way personalized as dancers are very fastidious about the way they sew, break in, and prepare new pointe shoes. Your relationship with your shoes becomes a personal one as your shoes become an extension of yourself. Your pointe shoes will cycle through the “new” to “perfect” to “dead” stages. One way to get the most out of your shoes is to sew them properly. I am going to show you the basics of preparing your pointe shoes and how I like to personalize mine.

Step 1: Gather Materials


  • Scissors
  • Pen
  • Lighter
  • Sewing Kit
  • Elastic
  • Ribbon
  • And of course, pointe shoes (shown below are Capezio Nicolini - These pointe shoes have been discontinued for more than 10 years. They were one of the narrowest pointe shoe models in the Capezio line. The Nicolini fits a small majority of dancers who need a very narrow pointe shoe. Soon these pointe shoes will become a collectors item, along with the Capezio Ultimo and the Dura-Toe. You'll definitely want a pair to add to your collection.)

Step 2: Prepare Your Shoes

Every dancer has her own routine for breaking in her pointe shoes. A few things that I always do when preparing my shoes are:
  • Soften the shoe: Begin by taking the toe box in one hand and the heel in the other. Bend the shoe in the middle, folding it in half, then repeat by folding the opposite way. Continue until you feel like your shoe has "some give".
  • Soften the box: A good ol’ fashioned bang against a hard floor will do the trick, you can also gently massage the sides of the toe box with your hands. Some dancers soften the box by standing on top of their shoes. Be warned, great care must be taken to avoid "breaking" the toe box so I do not recommend using this method. You can also use a wash cloth damped with warm (NOT HOT) water or alcohol as these won't damage or leave stains on the shoe. Try not getting the top of the box wet.
  • Soften the shank: The shank is the stiff mid-sole in the arch of the foot. Gently massage the demi pointe area of the shank, or the area that bends while on relieve. Find the area where your heel ends and your foot begins, bend it there. It's better than bending the exact middle; as that can shorten the life of your shoe and possibly break the shank.
  • Rough the satin: Even with rosin, the satin can be quite slippery. I like to scrape the soles and box of the shoe against a rough surface (usually a sidewalk outside)
  • Dance in them: Nothing can break in your shoes like a few sessions at the barre. Relevés & Pliés, along with any demi pointe exercises will help break in your new shoes..
     

Step 3: Sew On Elastic

Dancers either sew their elastic on the inside or outside of the shoe. I prefer to have mine hidden so this method will be from the inside. Also note there are 2 main types of elastic and either is fine to use.


  1. Start by folding the back of the shoe inside out.
  2. Sew one end of the elastic directly next to the back seam.
  3. Begin sewing in one corner of the elastic and sew around all four sides as seen above.
  4. Measure where to sew the other end by pulling the elastic across the top of your ankle and make a mark on the inside of the elastic at the point that it feels snug.
  5. Repeat on the other side of the back seam.

Step 4: Sew the Ribbon

There are a few methods when it comes to sewing ribbons which can include using one continuous piece wrapping underneath the arch or cutting in half and adding elastic. First, have a cup of coffee and relax, this might take a while. My sewing method is to place them adjacent to the center seam of the shoe. I prefer this method as it allows the ribbons to lay flush against the top of your feet when you are standing flat and when on pointe. If your pointe shoes have a separate, unattached lining, sew your ribbons onto the lining only. If the lining is bonded to the outer satin and you must sew all the way through, using running stitches throughout.

  1. Take the package of ribbon, fold in half once and again once more.
  2. Cut into four even pieces.
  3. Singe the ends of each ribbon with a lighter to avoid fraying.
  4. Fold the end of the ribbon where you’ll be sewing 1/4 of an inch.

Keep in Mind


  • Some dancers only sew through the canvas layer on the inside of the shoe so that stitches are not visible from the outside. Some dancers also like to sew all the way up to the drawstring casing, but I prefer to stop just below. It is a matter of preference, but be careful never to sew through the drawstring.
  • When tying the drawstring itself, no matter how tempting it may be to cut the extra-resist! You’ll be much happier that you tucked the bow underneath the vamp. You don’t want to accidentally tie it too tight and be stuck with digging drawstrings in your achilles.
  • When tying the ribbons for your shoes, be sure to tie the knot on the inner ankle. Tying the knot on the outside or back of your ankle can be dangerous and cause injuries.
Happy dancing!

Until next time. - D💋 


FOLLOW ME ↓
FB - https://www.facebook.com/mssoellegant
IG - https://www.instagram.com/mssoellegant
SC -  https://www.snapchat.com/add/mssoellegant
Blog - https://www.mssoellegant.blogspot.com

AFFILIATE LINKS & CODES ↓
https://www.ipsy.com/new?cid=ppage_opensubs&sid=link&refer=ws5xn
https://share.fashionnova.com/x/NKprBC
https://glossgenius.com/invite/theglowmother