Showing posts with label crafting. Show all posts

DIY No Sew Bow Tie


What's better than seeing the guys in your life dappered up in a stylish bow-tie? When the bow-ties are specifically made by YOU!

This special DIY doesn't require any sewing skills or a trip to the store for supplies! With simple materials you can take absolutely any fabric you want and transform it into a custom-made bow-tie! Since you only need a little, try using a vintage scrap of something you love or a piece of fabric that means something to you and your family. But this DIY works on silks and other fancier fabrics too, making it ideal for every event.

THE TOOLS
  • > Roughly 1/2 yard of fabric (your choice)
  • > Scissors
  • > Ruler
  • > Iron and ironing board or surface
  • > Pencil
  • > Hot glue gun and glue sticks
  • > Iron-on Velcro (Optional)

HOW TO
1. Measure and cut your pieces. You will need one of each of the following pieces: 20x3.5", 6x1.75", 8.75x4.5", 9.5x5". If you're making a child-sized bow-tie, you'll need to adjust the size accordingly.

2. Prep your pieces. Starting with the 9.5x5 and 8.75x4.5 rectangles, fold the two long sides to meet in the middle and iron to create flat folds. The fold the two end sides down and hot glue into place. Repeat for the the two narrow pieces.

3. Create the bow. Take the two rectangles and stack the smaller one on top of the larger one, securing in place with hot glue on each corner and in the middle. Next, fold in half towards you and hot glue directly in the center and pinch together. Turn your seam to the inside then fold in half and fold the sides down then secure with hot glue, holding in place to let the glue harden.
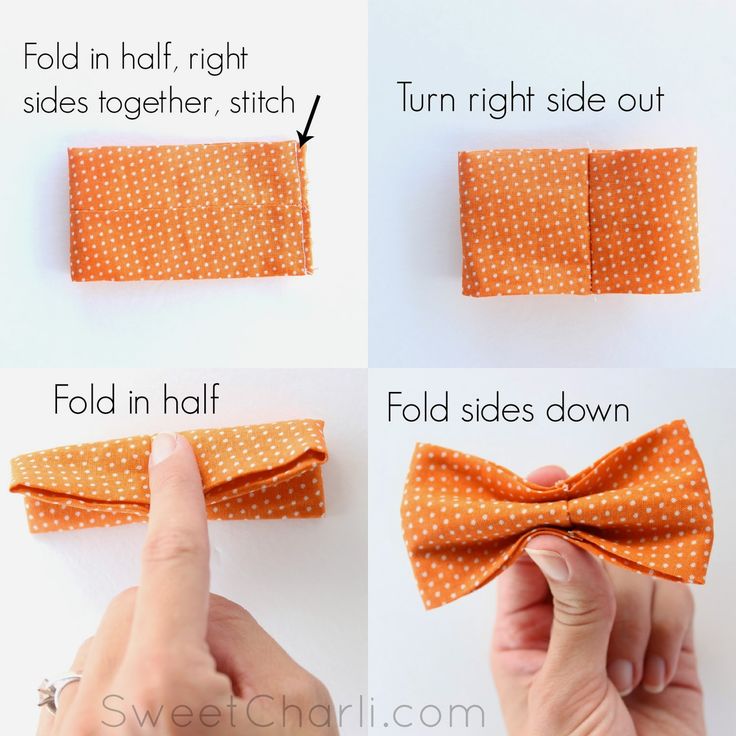

5. Assemble the bow-tie. With the bow facedown, use a little hot glue to attach the 20" strip, making sure to attach it in the middle. Next, glue one end of the 6" piece to the center of the back and wrap around the front of the bow and secure again in the back with hot glue, trimming it as needed to fit. An alternative method would be to secure the center piece first with hot glue and then safety pin on the strap.

6. Finally, if using velcro, iron on 3" of Velcro to the straps. Make sure to iron on opposite sides so they meet up to fasten together. If not, tie straps together then tuck under!

I hope you enjoyed this simple DIY!

Until next time. - D💋

FOLLOW ME ↓
FB - https://www.facebook.com/mssoellegant
IG - https://www.instagram.com/mssoellegant
SC -  https://www.snapchat.com/add/mssoellegant
Blog - https://www.mssoellegant.blogspot.com

AFFILIATE LINKS & CODES ↓
https://www.ipsy.com/new?cid=ppage_opensubs&sid=link&refer=ws5xn
https://share.fashionnova.com/x/NKprBC
https://glossgenius.com/invite/theglowmother

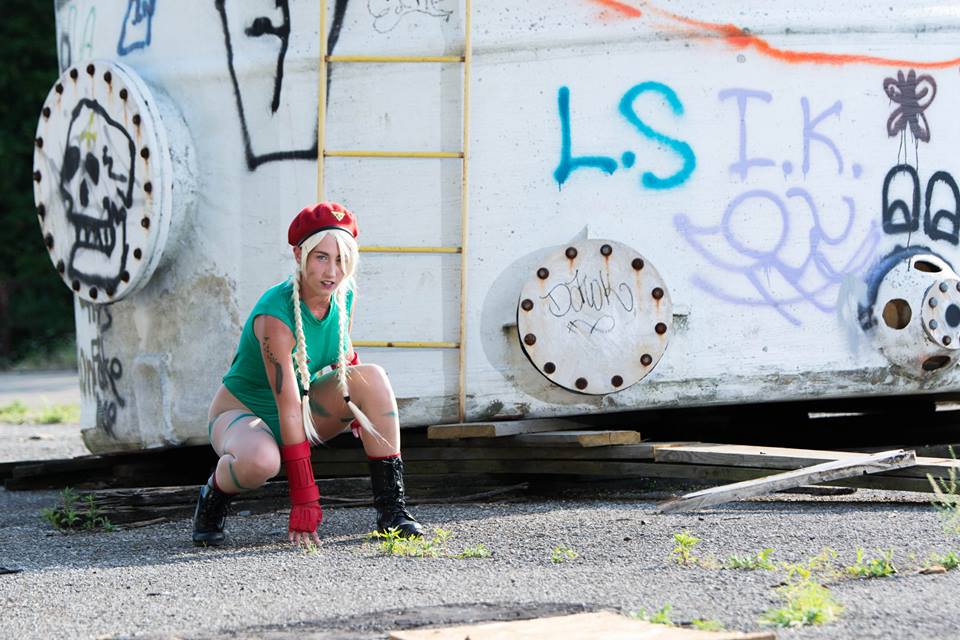
Cosplay - Delta Red Cammy White - DIY How To Cammy Gloves


Cammy, full name Cammy White, has been a character in the Street Fighter universe since the release of the third installment in the game released in 1993. Code name Killer Bee, she was the second female playable character to be introduced after Chun Li. Her role was a deadly assassin that would do Bison’s bidding, she lost her memory and joined the British as an M16 operative and fighter for her new government. Gaining further attention for her sex appeal, creating your own Cammy cosplay will be fun and bad ass!

There are a few things you will need when making your own Cammy costume.

  • Red Beret
  • Long Blonde Wig (Braided into 2 braids)
  • Green Sleeveless Mockneck Bodysuit
  • Red and Yellow Patches (hat and chest) 
  • Nude Tights
  • Army Green Stripes (legs) 
  • Socks & Boots
  • Red Forearm Armor/Fighting Gloves


All of those things can be found and pieced together however there is going to be one thing you wont be able to find without it costing you your arm and leg. That is cammy's gloves, or fighting armor. Screw getting on etsy and trying to pay someone when you can totally make them yourself! I am here to show you how!

I decided to become cammy as my first cosplay, which was also shot by Dragonfly Studios.


It may look fancy but trust me this is going to be easier than you think!


I made the base of the gloves and the knuckles out of 3mm craft foam, you can find it at Hobby Lobby or Michael's. You could also use 1mm, just layer it up.. The thick parts on the ends of the gloves were eva foam. I recommend measuring around your arm and stenciling on the foam before you cut anything out. I used old gardening gloves and chopped the fingers off before I put on the knuckles. Simply glue together with plain old super glue!


You could paint everything in a layer of Modge Podge, the matte kind. It not only primes the surface for the paint, but also adds some strength to the craft foam! I didn't have time nor felt like it so I took them outside and doused them with red spray paint. You can use acrylic paints, but it can take longer to dry.

Only one last tip: watch getting glue on your hands and the surface you are working on because it gets everyyyyyyyywhere!

Until next time. - D💋

FOLLOW ME ↓
FB - https://www.facebook.com/mssoellegant
IG - https://www.instagram.com/mssoellegant
SC -  https://www.snapchat.com/add/mssoellegant
Blog - https://www.mssoellegant.blogspot.com

AFFILIATE LINKS & CODES ↓
https://www.ipsy.com/new?cid=ppage_opensubs&sid=link&refer=ws5xn
https://share.fashionnova.com/x/NKprBC
https://glossgenius.com/invite/theglowmother